This article describes how to clone a live production linux server to a VM on ESX infrastructure although it is the same process to clone to another physical machine.
Prepare the Target Machine
Prepare a new server on ESX debian 32 bit machine, same hdd size etc:

In the past I’ve always used the DSL (Damn Small Linux) distro to boot from but this time I noticed that it didn’t pick up the hard drive on ESX so rather than mess around I tried Puppy Linux – it’s 160 MB compared to DSL’s 50MB but the hassle factor decided it for me and I’m very happy with it 🙂 
Check your fstab:
root@localhost:~# cat /etc/fstab

LABEL=DOROOT       /               ext4    errors=remount-ro 0       1
root@localhost:~# blkid /dev/disk/by-label/DOROOT

/dev/disk/by-label/DOROOT: LABEL="DOROOT" UUID="2c342fc9-3fcd-42fb-a837-1135ce07fe9c" TYPE="ext4"
Here we only have one filesystem to worry about – “/” – so it should be a straightforward exercise.
Make a single partition on our new VM (no swap partition on original – might need to address this)
Commands:
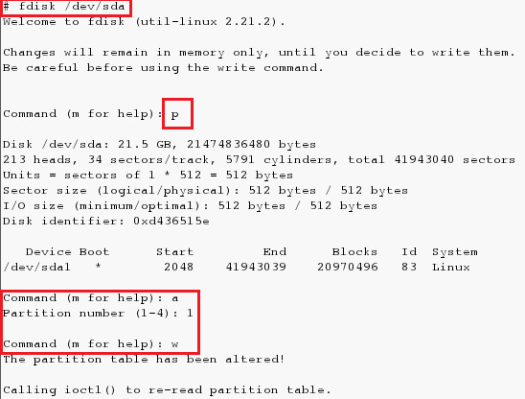
# fdisk /dev/sda (may be different to sda in your case, check your dmesg output)
Then “n” to add a new partition and accept the defaults for the start and finish – these will be the whole device. When done, enter “w” to write the partition to disk.
We also need to make it bootable so back into fdisk. “p” will print the partition table and here we can see /dev/sda1. Enter “a” to make a partition bootable and then the partition number; in this case we only have one partition butbasically you make the partition that contains “/boot” bootable. Again, enter “w” to write the partition to disk:

Format our partition using the same filesystem as our source machine – ext4 in this case:

Make a mount directory (remember we’re still in puppy linux in memory) and mount the hard drive partition(s) to it. Then create our other parts of the filesystem – dev, sys, proc and tmp:

Copy the Live System to the Target Machine
Make sure VM has connectivity to live source machine and perform the rysnc:

rsync -aHxvz root@1.2.3.4:/* /mount --exclude=/dev --exclude=/proc --exclude=/sys --exclude=/tmp
The switches used are as follows:
- -a – archive mode – a shortcut to avoid using multiple switches and ideal for backups – serverfault has a good description.
- -H – preserve hard links – not necessary for a backup but certainly for cloning
- -x – preserve extended attributes
- -v – verbose output – keep an eye on what’s going on
- -z – although it’s not on the screenshot above, use this to enable end-to-end compression.
Modify the Filesystem Table (fstab) and Install Grub
Update the filesystem table (fstab) if necessary. This is currently under /mount/etc/fstab – info on the format can be found here.
 Install the grub bootmanager using the following command:
# grub-install --root-directory=/mnt/sda1 /dev/sda
Once it’s done, say a quick prayer and reboot, hopefully job done!
** If, however, you run into errors (like the “/dev/sda does not have any corresponding BIOS drive” error) and you don’t have enough time or experience with grub configuration, my advice would be to download the most illustrious Boot Repair Disk and allow it to install / reconfigure your grub.
And then it really is job done 🙂
Cleaning Up!
Keyboard Map
For some reason, the keyboard map had changed, meaning that I my root password appeared to be wrong. Once I got logged in, a quick keyboard mapping sorted it out – easily done using the following command:
dpkg-reconfigure console-data
NIC Configuration
Your new machine will also have the same network configuration as your live one and will most likely need reconfigured – see the debian wiki for step-by-step instructions on how to achieve what you need. The main config file is /etc/network/interfaces.
/tmp Permissions
Make sure your /tmp directory has correct permissions set; you may not notice this until a daemon fails e.g. mysqld because it can’t write to the directory
# chown root:root /tmp

# chmod 1777 /tmp
Like this:
Like Loading...


